Saturday, 13 November 2010

Gingerbread Whoopie Pies with Maple Frosting


Not too sweet yet full of intense spiciness, Gingerbread Whoopie Pies are the perfect holiday season treat and are a nice complement to hot coffee or tea. At first it seemed that the intensity of the ground spices might be overwhelmingly strong, or at least might overpower the subtleness of the maple syrup frosting, but the combination actually turned out to be quite nice. And this recipe didn't need much tinkering at all. I only added a little extra liquid (milk) since the batter seemed to get firmer and firmer the more it stood in the bowl. So give it a shot, you won't be disappointed;)

Gingerbread Whoopie

Ingredients:

4 cups all-purpose flour
1 1/2 teaspoons ground ginger
1 1/2 teaspoons ground cinnamon
1/2 teaspoon ground cloves
1/4 teaspoon ground nutmeg
1 teaspoon salt
1 teaspoon baking soda
1/2 cup (1 stick) unsalted butter, at room temperature
4 tablespoons vegetable shortening
3/4 cup (packed) brown sugar
1 large egg
3/4 cup molasses
1 cup buttermilk

Directions:

Preheat oven to 325 F. Line two baking sheets with parchment paper.

In a mixing bowl sift together the flour, ginger, cinnamon, nutmeg, cloves, salt and baking soda.

In the work bowl of a stand mixer fitted with the paddle attachment, beat together the butter, vegetable shortening, and brown sugar until fluffy and smooth, about five minutes. Add the egg, beating well, and then the molasses. Scrap down the sides of the bowl.

Add half of the flour mixture and half of the buttermilk to the batter and beat on low until just incorporated. Scrap down the sides of the bowl. Add the remaining flour mixture and buttermilk and beat until completely combined.

Using a spoon or 1-tablespoon scoop, drop a rounded spoon of batter onto one of the prepared baking sheets and repeat, spacing them at least 2 inches apart. Bake one sheet at a time for 12 minutes each, or until the pies spring back when pressed gently. Remove from the oven and let the cakes cool on the sheet for about 5 minutes before transferring them to a rack to cool completely.

Maple Marshmallow Frosting

Ingredients:

1 container (16 oz) Marshmallow Fluff
2 sticks butter (1 salted and 1 unsalted)
1 1/2-2 cups confectioners' sugar
4 Tablespoons real Maple syrup
1/4 teaspoon maple flavoring (optional)

Directions:

In the work bowl of a stand mixer fitted with the paddle attachment, beat together the Marshmallow Fluff and butter until smooth and fluffy. Add the confectioners' sugar, maple syrup and maple flavoring and beat until light and fluffy, about 3 minutes.

Once the cakes are completely cooled, drop a spoon sized amount of frosting onto the bottom side of one of the cakes. Gently add the top cake.

Monday, 18 October 2010

Red Velvet Whoopie Pies with Classic Marshmallow Frosting


Being that Red Velvet cupcakes are my favorite cupcakes on earth, I decided to try Red Velvet Whoopie Pies. I can now safely say that the only thing better than a Red Velvet cupcake is a Red Velvet Whoopie Pie. Though my new Whoopie Pie book has been somewhat unreliable as recipes go, this recipe didn't need much tinkering. Just a little extra buttermilk here and a little less cocoa powder there and we've got ourselves some spectacular Red Velvet Whoopie Pies. So here is the recipe, tried and true.

Red Velvet Whoopie Pies with Classic Marshmallow Frosting

Ingredients:

2 1/2 cups all purpose flour
3/4 cup cocoa powder
1 teaspoon baking powder
1/2 teaspoon baking soda
1/2 teaspoon salt
1/2 cup (1 stick) unsalted butter, at room temperature
1/2 vegetable shortening
1/2 cup (packed) brown sugar
1 cup granulated sugar
2 large eggs
2 teaspoons vanilla extract
1 ounce (usually the size of a small bottle) red food coloring
1 cup buttermilk

Directions:

Position a rack in the center of the oven and preheat the oven to 350 F. Line two baking sheets with parchment paper.

In a bowl, sift together the flour, cocoa powder, baking powder, baking soda and salt. In a separate mixing bowl with a standing mixer fitted with the paddle attachment, beat together the butter, shortening and both the sugars until light and fluffy.

Add the eggs to the butter and sugar mixture one at a time, beating well after each addition. Scrap down the sides and add the vanilla extract and red food coloring. Beat again until just blended.

Add half of the flour mixture and half of the butter milk to the batter and beat on low until just incorporated. Scrap down the sides of the bowl. Add the remaining flour mixture and buttermilk and beat until completely combined.

Using a spoon, drop about one rounded tablespoon of batter onto one of the prepared baking sheets and repeat, spacing them two inches apart, until the baking sheet is full. Bake one sheet at a time for 10 minutes each, or until the cakes spring back when pressed gently. Remove the baking sheet from the oven and let the cakes cool on the baking sheet for 5 minutes before transferring them to a rack to cool completely.

Makes about 36 four-inch cakes.

Classic Marshmallow Frosting

Ingredients:

1 jar (16oz) marshmallow fluff
2 1/2 sticks butter (1 1/2 salted, 1 unsalted)
2 cups confectioners' sugar
1 1/2 teaspoons vanilla extract

Directions:

In a standing mixer with the paddle attachment beat the butter and marshmallow fluff until light and fluffy. Add the confectioners' sugar and vanilla extract. Beat again until fluffy. Scrap down the sides of the bowl and beat once more. Once the Whoopie Pies are completely cooled, frost with the rubber scraper for a more rustic look (as in my pictures) or use a piping bag for a more delicate look. Eat and enjoy!

Saturday, 9 October 2010

Mint Chocolate Whoppie Pie


Now, you may wonder what Whoopie Pies are doing on my CUPCAKE blog but if you've ever eaten a Whoopie Pie before you will know how similar to cupcakes they really are. Aside from the obvious difference in shape, the only other major difference is that cupcakes are slightly denser. So this is why I feel that Whoopie Pies have a legitimate place on my cupcake blog. That, and also because they are so fun to make and take photos of:)

My first attempt at Whoopie Pies went over pretty well considering the fact that I'm now baking in a new kitchen and everything is foreign to me. And I have to say that the only problems I encountered during this first attempt came from the faulty recipe itself, which came from a recipe book called Whoopie Pies that I recently bought in London and took back to NYC with me. The recipe that I tried was the mint chocolate combination. The only problem with the chocolate cake recipe was that it called for too little flour so once I figured that out (only three trays of trial and error) the rest was really easy. The other problem I came across was merely a question of taste. The mint buttercream frosting calls for 'mint extract' (which is a blend of spearmint and peppermint) where instead I would have used pure peppermint extract so that it tasted more like a peppermint patty and less like mint toothpaste. The other thing I found was that the quantity of frosting that the recipe makes is not nearly enough frosting for all the cakes that the cake recipe makes. This is easy enough to resolve since the frosting is so easy to make. You can just whip up another batch as soon as you see that you will need more. Whoppie Pies are incredibly easy and fun to make. Enjoy the modified and improved recipe below!

Classic Chocolate Whoopie Pie

Ingredients: (the cake)

1 3/4 to 2 cups all purpose flour (start with the lesser amount and add more only if needed...do a test cake first)
2/3 cups unsweetened cocoa powder
1 1/2 teaspoons baking soda
1/2 teaspoon salt
4 Tablespoons unsalted butter, at room temperature
4 Tablespoons vegetable shortening
1 cup (packed) dark brown sugar
1 large egg
1 teaspoon pure vanilla extract
1 cup whole milk

Directions:Preheat the oven to 375 F and line your baking sheets with parchment paper. Sift together the flower, coca powder, baking soda and salt onto a sheet of waxed paper. In your standing mixer, with a paddle attachment beat together the butter, shortening and brown sugar until light and fluffy (about 3 minutes). Scrap down the sides. Add the egg and vanilla extract and beat for another 2 minutes.

Add half of the flour mixture and half of the milk to the butter and sugar batter and beat on low until just combined. Scrap down the sides of the bowl. Add the remaining flour mixture and the remaining milk and beat until completely combined. The batter should not be runny and should hold its form on the tablespoon which you will use to drop them onto the baking sheets. It should be light and fluffy and not dense either.

Finally, drop a tablespoon size amount of batter onto your baking sheets two inches apart. I personally like the smaller sized Whoopie Pies but you can really make them any size you want. I always bake a test first just so I know exactly how big I want to make them or if the batter has the right consistency. It's better to spend the extra 10 minutes getting it right than to bake them all and only see your mistake at the end.

Bake one sheet at a time for 10 minutes or until the cakes spring back when pressed gently. Remove from the oven and let the cakes cool on the sheet for 5 minutes before transferring them to a rack to cook completely.

Mint Buttercream Frosting

2 cups confectioners' sugar
4-5 Tablespoons unsalted butter, at room temperature
3 Tablespoons heavy cream
2 teaspoons pure vanilla extract
1/2 teaspoon peppermint extract
1/2 teaspoon of salt
4 drops green food coloring

Directions: In a standing mixer or using a hand held mixer, whip together the butter and the confectioners' sugar until the mixture is crumbly. Add the heavy cream, vanilla extract, peppermint extract, salt and green food coloring. Beat on high until light and fluffy.

Once the Whoopie Pies have cooled completely, using a piping bag frost one of the cakes using a spiraling motion starting from the outside and working your way to the center. I did two layers of frosting but if you like less you can always just do one. Put the top cake on the frosted bottom one, eat and enjoy!

Saturday, 4 September 2010

Divine Coconut Lime Cupcakes


This is a simple yet delicious little twist on Ina Garten's Coconut cupcake recipe. The only differences between the two recipes are the additions of the lime juice and lime zest, and the subtraction of the almond extract. The nuttiness of the coconut and the tartness of the lime make for a really nice combination, especially as a summer dessert.

Coconut Lime Cupcakes:

Ingredients (makes 24)
• 3/4 pound (3 sticks) unsalted butter, room temperature
• 2 cups sugar
• 5 extra-large eggs at room temperature
• 1 1/2 teaspoons pure vanilla extract
• 2 tablespoons lime juice, freshly squeezed
• 3 cups flour
• 1 teaspoon baking powder
• 1/2 teaspoon baking soda
• 1/2 teaspoon kosher salt
• 1 cup buttermilk
• 2-3 tablespoons lime zest
• 14 ounces sweetened, shredded coconut

For the frosting:
• 1 pound cream cheese at room temperature
• 3/4 pound (3 sticks) unsalted butter, room temperature
• 1 teaspoon pure vanilla extract
• 1 teaspoon lime zest
• 1/8 cup lime juice (add slowly so that frosting doesn’t become to thin and runny)
• 1 1/2 pounds confectioners' sugar, sifted

Directions
Preheat the oven to 325 degrees F.
In the bowl of an electric mixer fitted with the paddle attachment, cream the butter and sugar on high speed until light and fluffy, about 5 minutes. With the mixer on low speed, add the eggs, 1 at a time, scraping down the bowl after each addition. Add the vanilla, lime juice and lime zest. Mix well.
In a separate bowl, sift together the flour, baking powder, baking soda, and salt. In 3 parts, alternately add the dry ingredients and the buttermilk to the batter, beginning and ending with the dry. Mix until just combined. Fold in 7 ounces of coconut.
Line a muffin pan with paper liners. Fill each liner to the top with batter. Bake for 25 to 35 minutes, until the tops are brown and a toothpick comes out clean. Allow cooling in the pan for 15 minutes. Remove to a baking rack and cool completely.
Meanwhile, make the frosting. In the bowl of an electric mixer fitted with the paddle attachment, on low speed, cream together the cream cheese, butter, and vanilla, lime juice and lime zest. Add the confectioners' sugar and mix until smooth.
Frost the cupcakes and sprinkle with the remaining coconut. Garnish with a thin slice of lime (just for looks, not for eating).

Wednesday, 18 August 2010

Coconutty Craziness


Ina Garten's Coconut cupcake recipe is the best, most coconutty recipe I have ever tried. Most people only sprinkle the coconut on top of the cupcakes once frosted; Ina, however puts a good 7oz in the cupcake batter itself. Herein lies the secret to the uniqueness of her recipe. It is so easy and so delicious you'll want to make them for every party you throw.

Ingredients: (Though the recipe says it makes 18-20 cupcakes, my batch came out to 26 large cupcakes)

  • 3/4 pound (3 sticks) unsalted butter, room temperature
  • 2 cups granulated sugar
  • 5 extra-large eggs at room temperature
  • 1 1/2 teaspoons pure vanilla extract
  • 1 1/2 teaspoons pure almond extract
  • 3 cups flour
  • 1 teaspoon baking powder
  • 1/2 teaspoon baking soda
  • 1/2 teaspoon kosher salt
  • 1 cup buttermilk
  • 14 ounces sweetened, shredded coconut (very hard to find in the UK)

For the Frosting:
  • 1 pound cream cheese at room temperature
  • 3/4 pound (3 sticks) unsalted butter, room temperature
  • 1 teaspoon pure vanilla extra
  • 1/2 teaspoon pure almond extract
  • 1 1/2 pounds confectioners' sugar
Directions:

Preheat the oven to 325 degrees F.

In the bowl of an electric mixer fitted with the paddle attachment, cream the butter and sugar on high speed until light and fluffy, about 5 minutes. With the mixer on low speed, add the eggs, 1 at a time, scraping down the bowl after each addition. Add the vanilla and almond extracts and mix well.

In a separate bowl, sift together the flour, baking powder, baking soda, and salt. In 3 parts, alternately add the dry ingredients and the buttermilk to the batter, beginning and ending with the dry. Mix until just combined. Fold in 7 ounces of coconut.

Line a muffin pan with paper liners. Fill each liner to the top with batter. Bake for 25 to 35 minutes, until the tops are brown and a toothpick comes out clean. Allow to cool in the pan for 15 minutes. Remove to a baking rack and cool completely.

Meanwhile, make the frosting. In the bowl of an electric mixer fitted with the paddle attachment, on low speed, cream together the cream cheese, butter, and vanilla and almond extracts. Add the confectioners' sugar and mix until smooth.

Frost the cupcakes and sprinkle with the remaining coconut (you won't use the entire 70z of remaining coconut but do be generous).

Friday, 4 June 2010

Rastachio Explosion


Today, after much convincing from two very good friends of mine, I decided to go in a slightly different direction from my usual fresh fruit cupcakes (only slightly since half the batch still do actually have fresh raspberries in them). Despite my dislike of nuts in desserts I decided to try a pistachio cupcake with creamy pistachio and white chocolate icing. And in the face of my nut prejudice, I discovered a magnificently rich and decadent combination. Add some fresh raspberries and it only gets better.

Though Susan and Mariel aren't here to eat my newest experiment, these cupcakes are dedicated to them. To Susan who gave me the great suggestion for the recipe and to Mariel for reminding me on a almost-daily-basis that my next creation had to be what Susan suggested Thanks ladies, your ideas and encouragement are much appreciated.

Vanilla cupcake recipe with Pistachios and fresh raspberries:

Ingredients: (Makes 24 cupcakes)

3 cups cake flour
1 1/2 teaspoons baking powder
1 1/2 teaspoons baking soda
1 teaspoon salt
3/4 cup (1 1/2 sticks or 6 ounces) unsalted butter, at room temperature
1 1/2 cups granulated sugar
2 large eggs, lightly beaten
1 teaspoon vanilla extract
1 1/2 cups (12 ounces) buttermilk
1 cup shelled and finely chopped pistachio nuts
1 cup fresh raspberries, tossed in flour

Preheat the oven to 350°F (or 177°C). Line 24 muffin cups with paper liners.

Directions:

Sift together the flour, ground pistachios, baking soda and baking powder in a bowl and set aside. With a standing or hand-held electric mixer, cream the butter then add the sugar and beat until fluffy. Add the eggs one at a time. Between each egg scrape down the sides and bottom of the bowl. Add the vanilla extract. Gently mix in the buttermilk. Stir in the dry ingredients (by hand, not with the mixer).

*Do not fold in the raspberries just yet.

Fill 12 paper cupcake cases with batter, using a 1/4 measuring cup for each one. Now, with half the batter remaining, fold in the raspberries and fill the remaining 12 cupcake cases. Bake for 15 to 18 minutes or until golden and a tester (I use a wooden toothpick) inserted into the center of the cupcakes comes out clean. Let the cupcakes cool for 5 minutes in the tin, then turn them out onto a wire rack to cool completely.

White Chocolate Icing:

200 grams white chocolate, chopped
6 tablespoons heavy cream
1 batch of vanilla buttercream icing (recipe below)

Vanilla Butter Cream:

10 tablespoons unsalted butter, softened
4 cups confectioners' sugar
3-4 tablespoons milk
1 teaspoon vanilla extract
1/4 cup ground pistachios

Directions:

First, roughly chop the white chocolate into chunks (or simply buy white chocolate chips) and place in a heatproof bowl over a small pot of boiling water. Be very careful not to let any water/steam touch the chocolate and do not overheat or burn it because it will seize and become unworkable. You can also melt the chocolate in a microwave for about 15 seconds, however, you have to watch it carefully so that it doesn't burn. Once melted, stir until smooth and creamy then set aside to cool.

Next, make the vanilla butter cream. Cream the butter in a separate bowl, slowly adding half of the confectioners' sugar and half of milk. Beat until well combined, starting on the lowest speed possible and gradually increasing, otherwise you will end up as I often do, covered in powdered sugar. After fully combined, add the rest of confectioners' sugar, the pistachios, the rest of the milk and the vanilla extract. Whip until fluffy.

Lastly, combine the melted white chocolate and the heavy cream together stirring until smooth. Pour the white chocolate mixture into the vanilla buttercream and beat once more until fluffy.

Ice the cupcakes once completely cool and garnish half the cupcakes with whole, shelled pistachios and the other half with some fresh raspberries!

Saturday, 29 May 2010

Black & White Cupcakery


Here's a simple yet very light and delicious chocolate cupcake recipe. I used the recipe from the Hummingbird Bakery cook book but I think I would experiment with other recipes next time. I like my chocolate desserts to be very chocolatey and rich so for chocolate cupcakes I wouldn't mind a denser or moister recipe. But if it's lightness you're going for, this is the perfect recipe.

The icing is a rich chocolate butter cream for half the cupcakes and a smooth vanilla buttercream for the other half, just to make things a little more interesting. With plain vanilla and chocolate cupcakes, you can really make any flavor/color icing you like. Raspberry is always a nice combination with chocolate but be creative and try anything really.

Chocolate Cupcakes (makes 12)

Ingredients:

3/4 cup plus 2 tablespoons all-purpose flour
2 1/2 tablespoons unsweetened cocoa powder
3/4 cup granulated sugar
1 1/2 teaspoons baking powder
a pinch of salt
3 tablespoons unsalted butter, at room temperature
1/2 cup whole milk
1 egg
1/2 teaspoon pure vanilla extract
Optional: 100 grams of bittersweet milk, or dark chocolate, chopped (if you want the cupcakes to be richer and a little

Directions:

Preheat the oven to 325F

Put the flour, cocoa powder, sugar, baking powder, salt and butter in a bowl and mix with a handheld electric mixer (or in a free standing electric mixer if you have one) until a sandy consistency and everything is combined

Whisk the milk, egg and vanilla together and slowly pour about half the mixture into the flour mixture, beat to combine, and turn the mixer up to high speed to get rid of any lumps.

Turn the mixer down to a slower speed and slowly pour in the remaining milk mixture (scrape any unmixed ingredients from the side of the bowl with a rubber spatula). Continue mixing for a couple more minutes until the batter is smooth but do not over mix.

Optional: If you are going to use the extra chocolate, at this stage gently fold in the chopped chocolate.

Spoon the batter into the paper cupcake cases until two-thirds full and bake int he preheated oven for 20-25 minutes, or until the cake bounces back when touched. A wooden toothpick inserted into the center should come out clean. Let the cupcakes cook for five minutes in the pan and then turn out onto a wire rack to cool completely.

Chocolate and Vanilla Buttercream Icing (my own icing recipe, not taken from the Hummingbird Bakery cook book)

Ingredients:

7 tablespoons unsalted butter, at room temperature
2 1/2 cups confectioners' sugar
1/4 cup unsweetened cocoa powder
2 tablespoons whole milk or cream
a few drops pure vanilla extract

Directions:

Beat the butter, 1 tablespoon milk or cream and half the confectioners sugar together. Once well combined, add the rest of the sugar, the milk and the pure vanilla extract. Beat until light and fluffy. The longer you beat the icing, the fluffier it will become.

Take half the icing and put in a separate bowl. Add the 1/4 cocoa powder and beat until light and fluffy again. If the icing becomes to dry or hard to mix, add a few drops of milk or cream until you reach the correct, spreadable consistency. Now you have both vanilla and chocolate buttercream icing for your chocolate cupcakes.

Ice the cupcakes once completely cooled. Eat and Enjoy!

Monday, 24 May 2010

Bursting With Blueberries


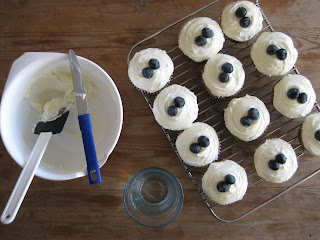
Today was one of those sunny, warm days that makes every act of procrastination justifiable. With the windows wide open and the curtains lightly swaying in the warm breeze I decided to put off my thesis research and make fresh blueberry cupcakes instead. Though it takes me only an hour to make and ice the cupcakes, today was not the day to sit inside for hours on end researching. After a nice long walk in the park, food shopping that took way longer than it should have, and finally, reading my favorite travel magazine (AFAR) front to back in one sitting, I made my blueberry cupcakes. Today, as I bite into a perfectly light cupcake laden with warm succulent blueberries and topped with delicate velvety icing, I can still justify my act of defiance. Tomorrow however, will be another story.

Like with the raspberry and peach cupcakes, I used the vanilla cupcake recipe and just added fresh blueberries. For the icing I used a vanilla buttercream with a few tablespoons of cream cheese for a touch of tartness. I honestly can't say which of the two berry cupcakes I like better because they are both so good and so perfect for a summer dessert. So you're gonna have to try them both yourselves.

Vanilla cupcake recipe with fresh Blueberries:

Ingredients: (Makes 24 cupcakes)

3 cups cake flour
1 1/2 teaspoons baking powder
1 1/2 teaspoons baking soda
1 teaspoon salt
3/4 cup (1 1/2 sticks or 6 ounces) unsalted butter, at room temperature
1 1/2 cups granulated sugar
2 large eggs, lightly beaten
1 teaspoon vanilla extract
1 1/2 cups (12 ounces) buttermilk
2-2 1/2 cups fresh blueberries, tossed in flour

Preheat the oven to 350°F(or 177°C). Line 24 muffin cups with paper liners.

Directions:

Sift together the flour, baking soda and baking powder in a bowl and set aside. With a standing or hand-held electric mixer, cream the butter then add the sugar and beat until fluffy. Add the eggs one at a time. Between each egg scrape down the sides and bottom of the bowl. Add the vanilla extract. Gently mix in the buttermilk. Stir in the dry ingredients (by hand, not with the mixer). Fold in the blueberries.

Divide the batter evenly among the prepared cupcake liners using a 1/4 measuring cup for each one. Bake for 15 to 18 minutes or until golden and a tester (I use a wooden toothpick) inserted into the center of the cupcakes comes out clean. Let the cupcakes cool for 5 minutes in the tin, then turn them out onto a wire rack to cool completely.

Vanilla Buttercream and Cream Cheese Icing

Ingredients:

10 tablespoons butter, softened
6 tablespoons
4 cups sifted confectioners' sugar
2-3 tablespoon whole milk (if the icing is too thick just keep adding milk until you reach the right, spreadable consistency)
1 teaspoon pure vanilla extract


Directions:

Cream butter and cream cheese in a bowl. Slowly add half of the confectioners' sugar and half of the milk. Beat until well combined. Add the rest of the sugar, the rest of the milk, and the vanilla extract. Whip until light and smooth. Ice the cupcakes once they have cooled entirely. and garnish with blueberries.


Eat and enjoy!


Friday, 21 May 2010

Red Velvet Revolution


I have to say, Red Velvet cupcakes are by far my favorite. Not only are they a stunningly beautiful deep red, they taste as good as they look. Until I actually made my own red velvet cupcakes, I didn't know where the deep red color came from. I knew it wasn't food coloring alone. In fact, it's very simple. The mixture of the red food coloring with the coco powder is the secret to the incredibly beautiful color. It's a lot of food coloring though, so be prepared for red fingers and a red tongue (if you're like me and constantly lick your fingers). And wear an apron for this one.

Over the course of a few days, and many mishaps, I finally decided on the red velvet cupcake recipe from the Hummingbird Bakery baking book that I bought a little while ago. I like this recipe for two reasons. One, it is the perfect color - not all recipes call for the same amount of food coloring so some are pinker and lighter than others. And two, the actual cupcake itself is not too sweet which helps balance out the sweetness of the icing. The sweetness factor is key in making great cupcakes. I have had many a cupcake that has left me feeling a little woozy from the overdose of sugar and I have, admittedly, a very strong sweet tooth so you can only imagine how sweet they must have been. You don't want to make people sick from the sweetness of your cupcakes because you really want them coming back for more.

I'm always very thankful to my roommates for inexhaustibly offering up their tasting skills because by the time I'm finished baking and icing, I've usually licked an entire cupcake's worth of batter and icing off my fingers and I can't imagine having to eat another one just yet. Frenchie, the self-proclaimed "sssugar boy" is probably my most accurate sweetness meter. Though I love my sugar, he may love it even more, which means, if it's too sweet for him, it's
way too sweet for everyone else. Between the moist deep red cupcake and the creamy white icing, these red velvet cupcakes are quite the indulgence.

Hummingbird Bakery Red Velvet Cupcakes (makes 12)

Ingredients: (preheat oven to 325)

4 tablespoons unsalted butter, at room temperature
3/4 cup granulated sugar
1 egg
2 1/2 tablespoons unsweetened coco powder
3 tablespoons red food coloring
1/2 teaspoon pure vanilla extract
1/2 buttermilk (you can buy buttermilk almost anywhere but you can also make your own. Simply add 1 tablespoon distilled white vinegar to 1 cup whole milk and let sit for at least one hour)
1 cup plus 2 tablespoons all-purpose flour
1/2 teaspoon baking soda
1 1/2 teaspoons distilled white vinegar

Directions:

With a handheld electric mixer, or a freestanding electric mixer, cream the butter and the sugar until white and fluffy. Add the egg and beat until well combined. Scrap down the sides of the bowl.

In a separate small bowl, combine the coco powder, red food coloring and vanilla extract to make a thick paste. Add to the butter and sugar mixture and beat thoroughly. Scrap down the sides of the bowl once more.

On low speed, slowly add half the buttermilk. Beat until well combined and then add half the flour beating again until everything is well incorporated. Repeat this process until both the buttermilk and flour have been added. Scrape down the sides of the bowl then turn the mixer on high and beat until smooth and even.

Turn the mixer down to low and add the baking soda and vinegar. Beat on low until well combined then turn up to high speed and beat for a couple more minutes. Spoon batter into the cupcakes paper cases until three-quarters full and bake in the preheated oven for 20-25 minutes, or until the cake bounces back when touched. A toothpick inserted into the center should come out clean.

Let cool in cupcake tin for five minutes then turn out onto wire rack to cool completely.

Vanilla buttercream icing (with a little cream cheese for tartness)

For the icing I used a very light cream cheese icing, not the icing from the Hummingbird Bakery recipe. It's a personal preference merely. I just don't like the taste of too much cream cheese on my cupcakes so I only put a meager two tablespoons of cream cheese in my normal vanilla buttercream icing instead of 4oz. If you like the cream cheese icing feel free to use the full 4oz.

Ingredients:

2 tablespoons cream cheese, chilled
5 tablespoons unsalted butter, softened
2 cups confectioners' sugar
1 tablespoon milk
1/2 teaspoon vanilla extract

Directions:

Cream the butter and cream cheese in a bowl, slowly adding 1 cup of the confectioners' sugar and 1 tablespoon of milk. Beat until well combined, starting on the lowest speed possible and gradually increasing, otherwise you will end up as I always do, covered in powdered sugar. After fully combined, add the 2nd cup of confectioners' sugar and the vanilla extract. Whip until fluffy.

Ice the cupcakes once completely cooled. Eat and enjoy!

Tuesday, 18 May 2010

Raspberry Takes The Cupcake


Once I settled on a vanilla cupcake recipe, adding the fruit of choice was easy. Today I decided on raspberry and as my French roommate keenly observed before demolishing four in a row with hardly a breath in between, "zeez are zee best ones yet!!" This recipe make 24, however, keeping my roommates-turned-tasters in mind, and remembering my first attempt at rhubarb cupcakes - little geen unidentifiable blobs dispersed randomly throughout the cupcake are not as beautiful as I had imagined rhubarb would be - I only made half the recipe in case they turned out to be another miss. After having witnessed "Frenchie", whom I now think is the world's fastest cupcake eater, down nearly half the cupcakes in one sitting, I realized that I could have made 24 and still only have been left with two for myself.
The reason why raspberry works so well in cupcakes is because it's a fruit that's not as dense and juicy as, say, peaches and nectarines (especially the canned ones) therefore it doesn't release its juice into the batter upon being baked which makes it hard for the batter to rise, leaving a very dense, moist cupcake. Also, raspberries are a bit tart which is a nice contrast to the sweetness of the icing.

Vanilla cupcake recipe with fresh raspberries:

Ingredients: (Makes 24 cupcakes)

3 cups cake flour
1 1/2 teaspoons baking powder
1 1/2 teaspoons baking soda
1 teaspoon salt
3/4 cup (1 1/2 sticks or 6 ounces) unsalted butter, at room temperature
1 1/2 cups granulated sugar
2 large eggs, lightly beaten
1 teaspoon vanilla extract
1 1/2 cups (12 ounces) buttermilk
2 cups fresh raspberries, tossed in flour

Preheat the oven to 350°F(or 177°C). Line 24 muffin cups with paper liners.

Directions:

Sift together the flour, baking soda and baking powder in a bowl and set aside. With a standing or hand-held electric mixer, cream the butter then add the sugar and beat until fluffy. Add the eggs one at a time. Between each egg scrape down the sides and bottom of the bowl. Add the vanilla extract. Gently mix in the buttermilk. Stir in the dry ingredients (by hand, not with the mixer). Fold in the raspberries.

Divide the batter evenly among the prepared cupcake liners using a 1/4 measuring cup for each one. Bake for 15 to 18 minutes or until golden and a tester (I use a wooden toothpick) inserted into the center of the cupcakes comes out clean. Let the cupcakes cool for 5 minutes in the tin, then turn them out onto a wire rack to cool completely.

White Chocolate Icing:

200 grams white chocolate, chopped
6 tablespoons heavy cream
1 batch of vanilla buttercream icing

Vanilla Butter Cream:

10 tablespoons unsalted butter, softened
4 cups confectioners' sugar
3-4 tablespoons milk
1 teaspoon vanilla extract

Directions:

First, roughly chop the white chocolate into chunks (or simply buy white chocolate chips) and place in a heatproof bowl over a small pot of boiling water. Be very careful not to let any water/steam touch the chocolate and do not overheat or burn it because it will seize and become unworkable. You can also melt the chocolate in a microwave for about 15 seconds, however, you have to watch it carefully so that it doesn't burn. Once melted, stir until smooth and creamy then set aside to cool.

Next, make the vanilla butter cream. Cream the butter in a separate bowl, slowly adding half of the confectioners' sugar and half of milk. Beat until well combined, starting on the lowest speed possible and gradually increasing, otherwise you will end up as I often do, covered in powdered sugar. After fully combined, add the rest of confectioners' sugar, the rest of the milk and the vanilla extract. Whip until fluffy.

Lastly, combine the melted white chocolate and the heavy cream together stirring until smooth. Pour the white chocolate mixture into the vanilla buttercream and beat once more until fluffy.

Ice the cupcakes once completely cool and garnish with some fresh raspberries!